Hoping to enter the world of crypto?
First, you’ll need to set up a digital wallet. Here’s how.
First and foremost, a digital wallet is a crypto wallet that can hold a variety of digital assets, including Bitcoin, Ethereum, NFTs, and many other things built upon the blockchain. When you first set up a digital wallet, it’s normal to feel intimidated, but it’s really not as complicated as it seems.
In this article, we’ll walk you through the process of setting up a crypto wallet and show you some of the ways you can use it. We’ll also show you some of the best wallets available to use for storing digital assets and help you decide which one is right for you.
Let’s have a look at the step-by-step guide on setting up a smart wallet for yourself.

Say Hello, and Let's Get To Work Together
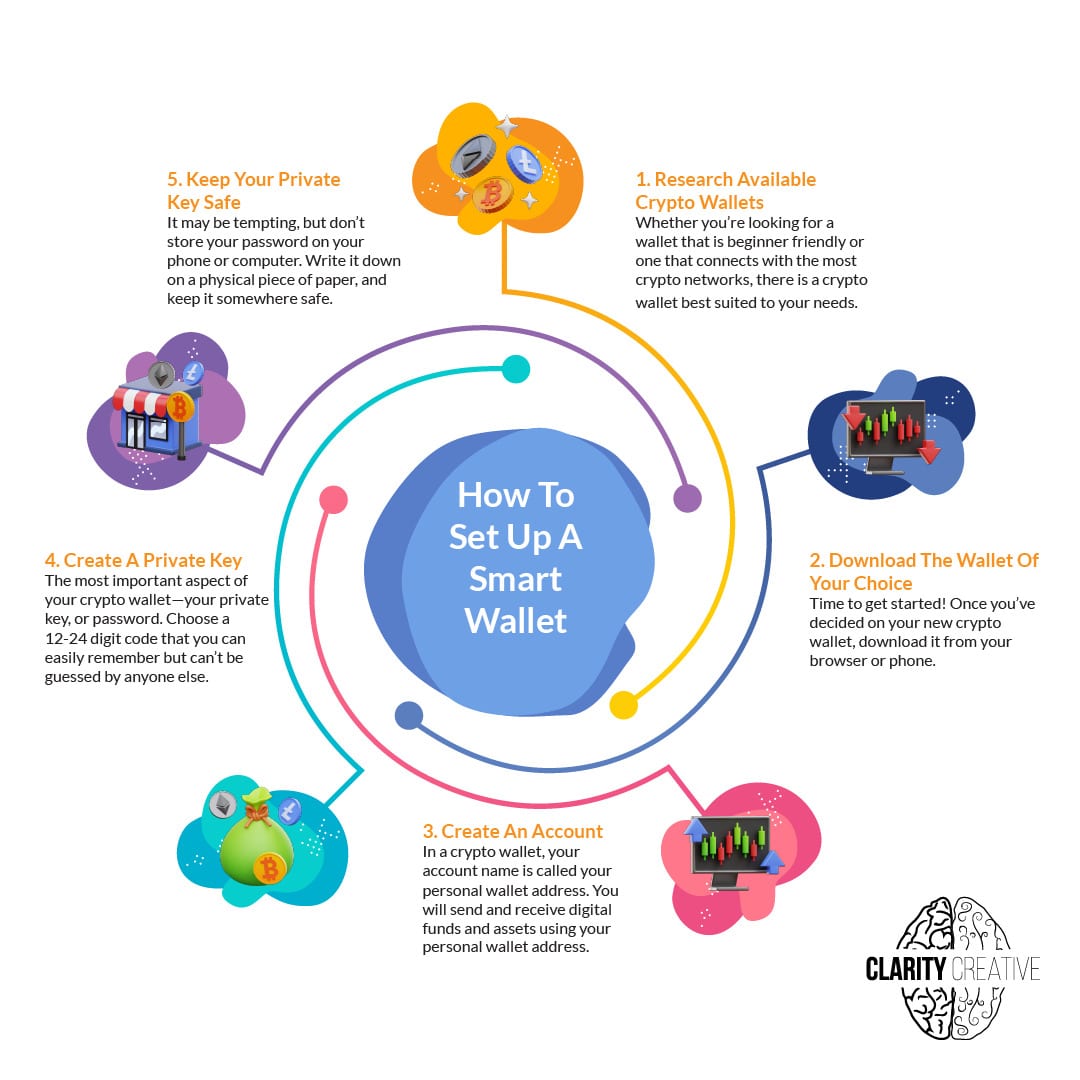
1. Research Available Crypto Wallets
The first step is to do some research and determine which wallet will work best for you. Here are some of the top wallets available:
MetaMask
MetaMask is the perfect choice for people who like to be in control of their own private keys. This is known as self-custody.
Private keys are like a secure password, only better. They consist of twelve randomly generated words that, when stored safely offline, are virtually unhackable. Many people have made mistakes with their private keys, however, and saved them on a computer or phone, which makes them vulnerable.
MetaMask offers connections to several networks, including Ethereum, the current most trafficked network. Featuring a Google Chrome extension along with a mobile app, MetaMask is likely the leader of the industry.
Coinbase Wallet
The Coinbase Wallet is a very popular choice for people who want to manage their digital assets but don’t have as much technical knowledge. Coinbase has always been a custodial solution for holding crypto, which means they incur the risk and are essentially providing security on your behalf. However, their wallet is a self-custody solution (just like MetaMask), where the assets and private key (see above) are the responsibility of the owner.
Using Coinbase’s regular service, just trading crypto is NOT self-custody, but the wallet product is. This is an important distinction because Coinbase Wallet and Coinbase are two different apps, both owned and operated by the successful company, Coinbase.
Rainbow
Rainbow Wallet is a very secure and easy-to-use wallet that allows you to manage your assets online or from the mobile app. They are one of the most aesthetically pleasing solutions, where assets are viewable from anywhere with little or no refresh required.
Rainbow, of the three options listed here, is from the youngest company and has a more web3-native approach. It is the least used out of MetaMask and Coinbase Wallet, but a savvy choice for those that enjoy a smoother user experience around digital assets and NFTs.

2. Download The Wallet Of Your Choice
Next, download the wallet of your choice.
The easiest way to do this is to go to the official website of the wallet you’ve chosen and click the “Download” option from their navigation menu. All of the examples above offer apps in the Apple Store and Android marketplace as well as desktop/laptop solutions.
As mentioned above, the industry leader at the moment is MetaMask. MetaMask is an open-source web3/Ethereum wallet that runs on your web browser or phone. It’s one of the most popular wallets available to use for digital assets (specifically NFTs) because it’s easy to use, very intuitive, and has an attractive user interface. It also provides some levels of security but is best paired with a “cold wallet” solution, which is a way to secure your digital assets at another level beyond just the private key storage.
Downloading the apps or web applications is as simple as using your preferred browser, though Chrome is the most popular browser. Some users prefer more secure browser solutions.

3. Set Up A Personal Wallet Address Within The Wallet
The next step is to set up a personal wallet address within the wallet. This is the address where you will receive your funds when you purchase any digital assets, NFTs, or cryptocurrency, such as Ethereum.
To do this, click on the “Create Account” button in the MetaMask wallet. This will open a new window where you will need to enter your account name.
The private key for your wallet is your personal 12 to 24-word password. During the setup of a wallet, you’ll be shown these words on your screen. They are meant to be written down somewhere safe, not stored on your computer or phone. While the wallet does store the key, that should be the only input of your private key ever. If anyone ever asks for your private key, it is an unsafe situation. No company or individual with positive intent would ask for your private keys.
When you are done, keep your MetaMask wallet address safe. The safest method is never saving it anywhere on a computer or mobile device. You will want to have it written down and locked away for maximum security. This will ensure that no one else can use your wallet.
Your unique wallet address is not only an Ethereum address but also your access to the next layer that connects you to these new digital networks via the smart contract. Smart contracts use a set of rules that describe how a digital or physical asset is stored, transferred, paid, and owned.
There are limitless possibilities for smart contracts, but for the sake of this instructional post, you’ll want to learn that a wallet address is the sole way to interact with smart contracts on any network. Smart contracts ensure that every single transaction on the network is transparent, secure, and verifiable by everyone.
No one can change the rules behind a contract without everyone else knowing about it! The most popular network at the time of publication is Ethereum, but that may change over time.
These wallet addresses are transparent and stored on the blockchain, and they make trading with other people quick and uncomplicated. Wallet addresses are also 100% public. In fact, you can put any wallet address into a website, such as Etherscan, and see exactly how many tokens are held.
A true public ledger!
There is a layer of communication built within a layer of sharing assets. Users are able to send funds, as well as request a smart token for goods and services. The next step in digital ownership.
That’s It!
Unlike traditional cryptocurrency wallets that only allow you to send and receive digital assets, a smart contract allows you to perform other functions as well. Smart contracts are an essential part of the cryptocurrency ecosystem that makes digital currencies so popular with users.
So, this is the end of our how-to guide on setting up a digital wallet. We hope that this will help you decide which wallet is right for you. If you have any other questions about setting up a smart wallet, please don’t hesitate to contact us.


